|
|
Generalisation Workflow
As the generalisation of one element will affect the generalisation of others, it is necessary to follow the procedure, in the correct sequence.
Because the location of many human features are relative to physical features, the basic topographic information is generally dealt with first. Thus, the usual order for generalising is:
- Generalisation of hydrographic features.
- Generalisation of contours lines and heights.
- Generalisation and correction of the place locations.
- Generalisation of human features and of all the features connected to inhabited places: roads, paths, etc.
- Generalisation of landuse and vegetation areas. They are generalised last as their outlines depend on the positioning of both physical and human features.
However, as each map has different features, elements and objectives, this sequence is not absolute. This sequence can vary from map to map and even from scale to scale.
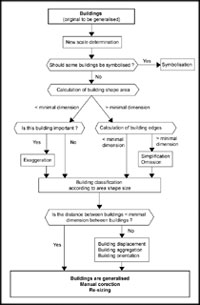
Flux Diagram of Building Generalisation
The following flux diagram is a typical example of computer based building generalisation. Such diagrams can only be used
for a specific developed site: the house density should not be too high (historic centre) or too low (hamlet), otherwise this
generalisation method could not be adapted anymore.
 Building Generalisation (Spiess)
See below the generalisation result of the previous flux diagram.
- The picture on the left is the original map at 1:5 000 scale.
- The picture in the center is the generalisation result of the previous flux diagram (1: 25 000).
- The picture on the right is the generalisation result, including manual correction (the houses on the top of the map).
This example shows you that each map context is different, and that the method should be adapted to it. This example also
shows that inputs and manual correction are still needed in modern computer-aided generalisation.


